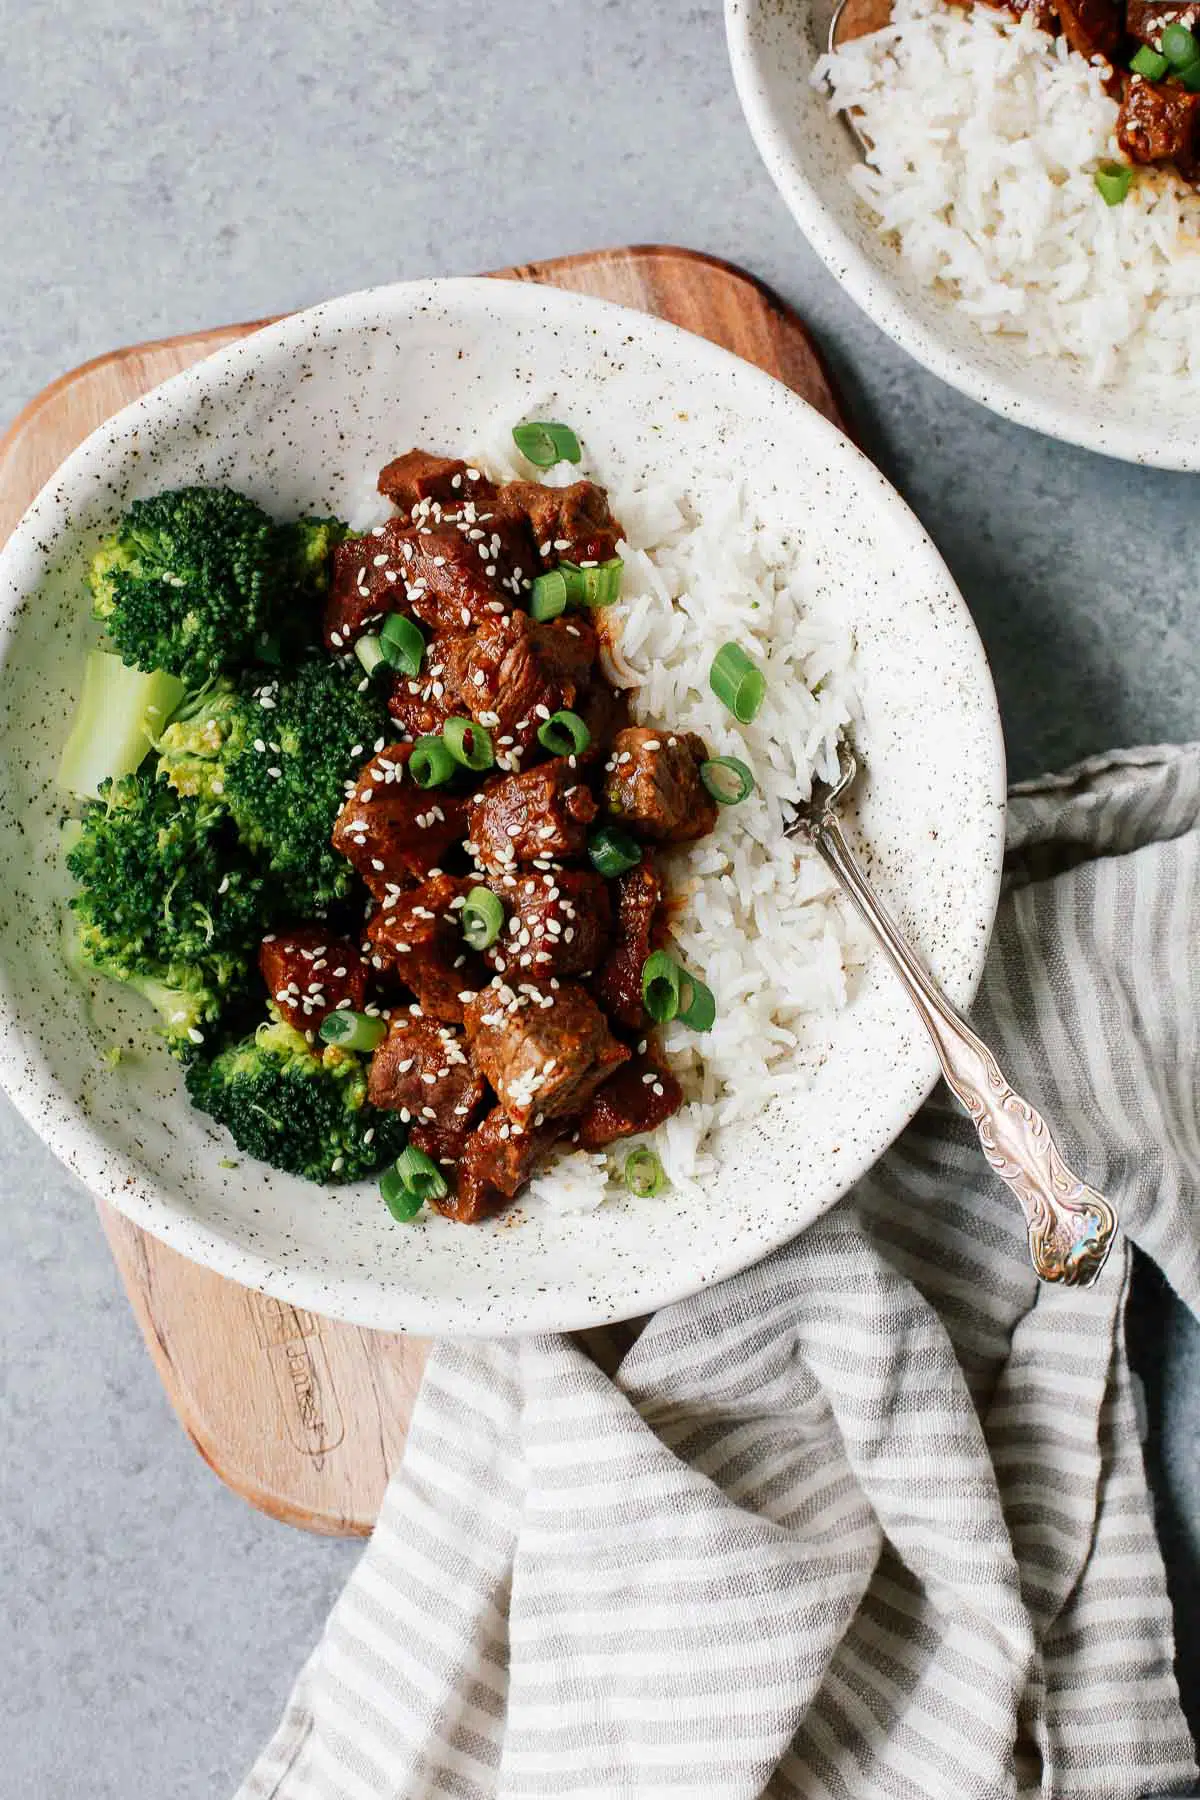
Instant Pot Korean Beef packs Asian flavors into a simple dish. Make this recipe for dinner tonight in under an hour!
This Instant Pot Korean Beef recipe only requires a few steps, and it’s easy to make. I love using the Instant Pot for this recipe, because it doesn’t take a lot of time and the meat comes out so tender, like this Instant Pot Meat Sauce Recipe, Instant Pot Sweet Potato Kale Beef Soup, and Easy Instant Pot Chicken Stew.
Many of the ingredients you should already have on hand. As a result, it’s the perfect meal for when you can’t get to the grocery store. You’ll have dinner ready in no time!
If you like Instant Pot beef recipes, try these recipes: Instant Pot Vegetable Beef Soup, Instant Pot Beef Stew Recipe, and Instant Pot Vegetable Beef Soup.
Ingredients
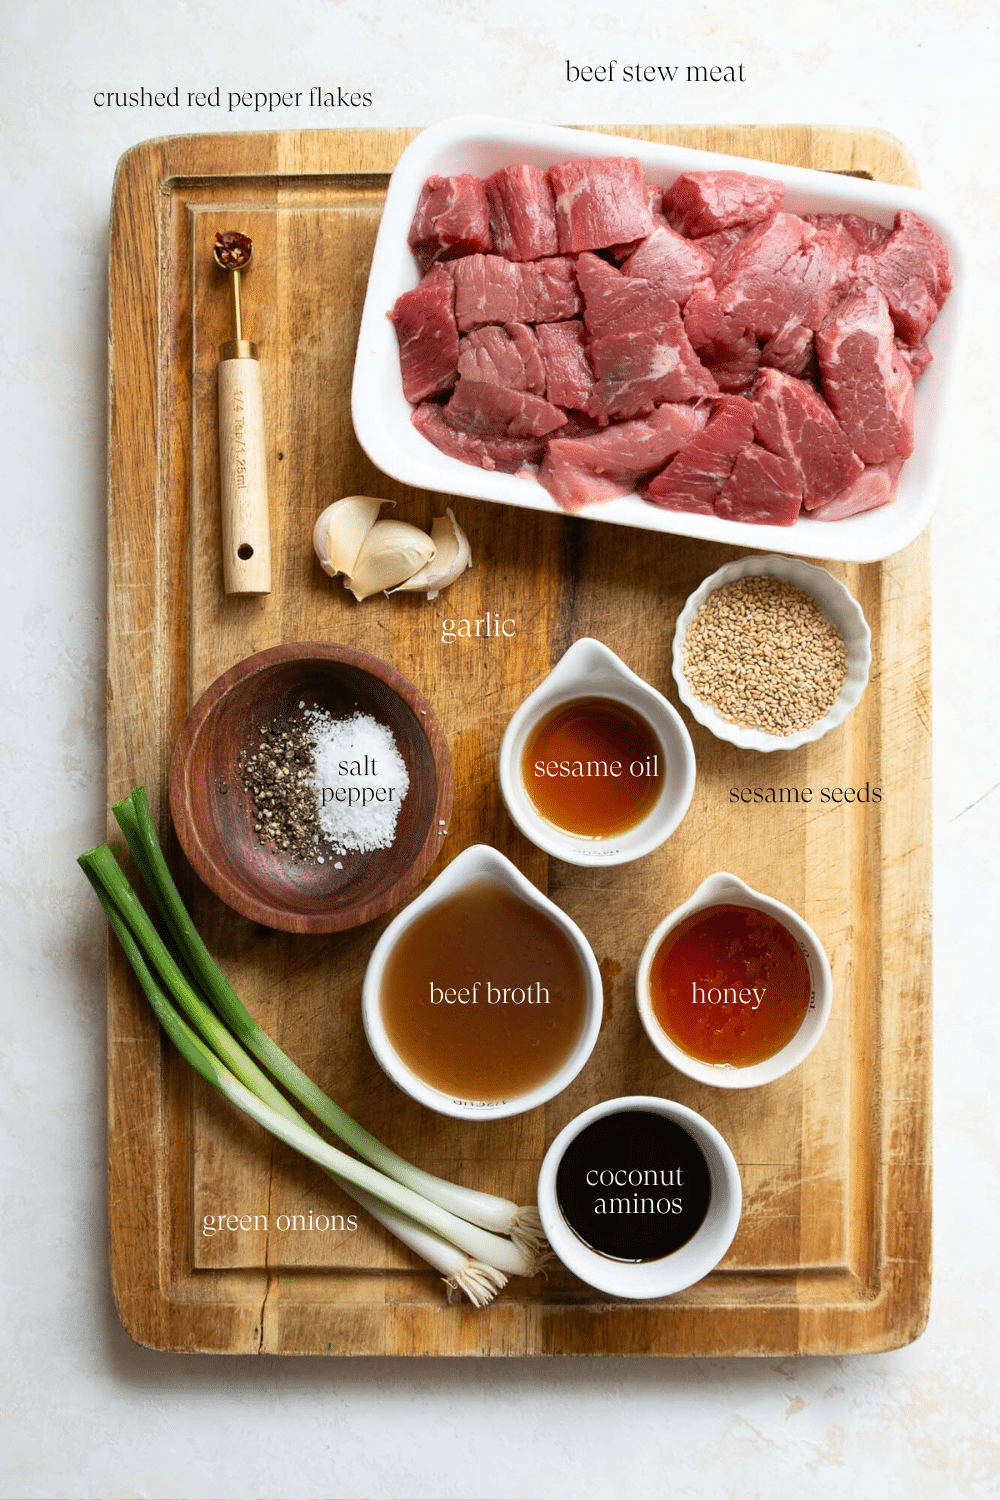
Broth or beef stock – beef works best, but chicken or vegetable will work too
Coconut aminos – this is what makes the recipe gluten-free. If you don’t have gluten allergies or sensitivities, you can use low sodium soy sauce instead. Tamari is another soy sauce alternative made by fermenting soybeans and is typically gluten-free.
Honey – You can substitute brown sugar in equal amounts.
Crushed red pepper flakes – use Sriracha or Gochujang instead to make this extra spicy.
How to make Instant Pot Korean Beef
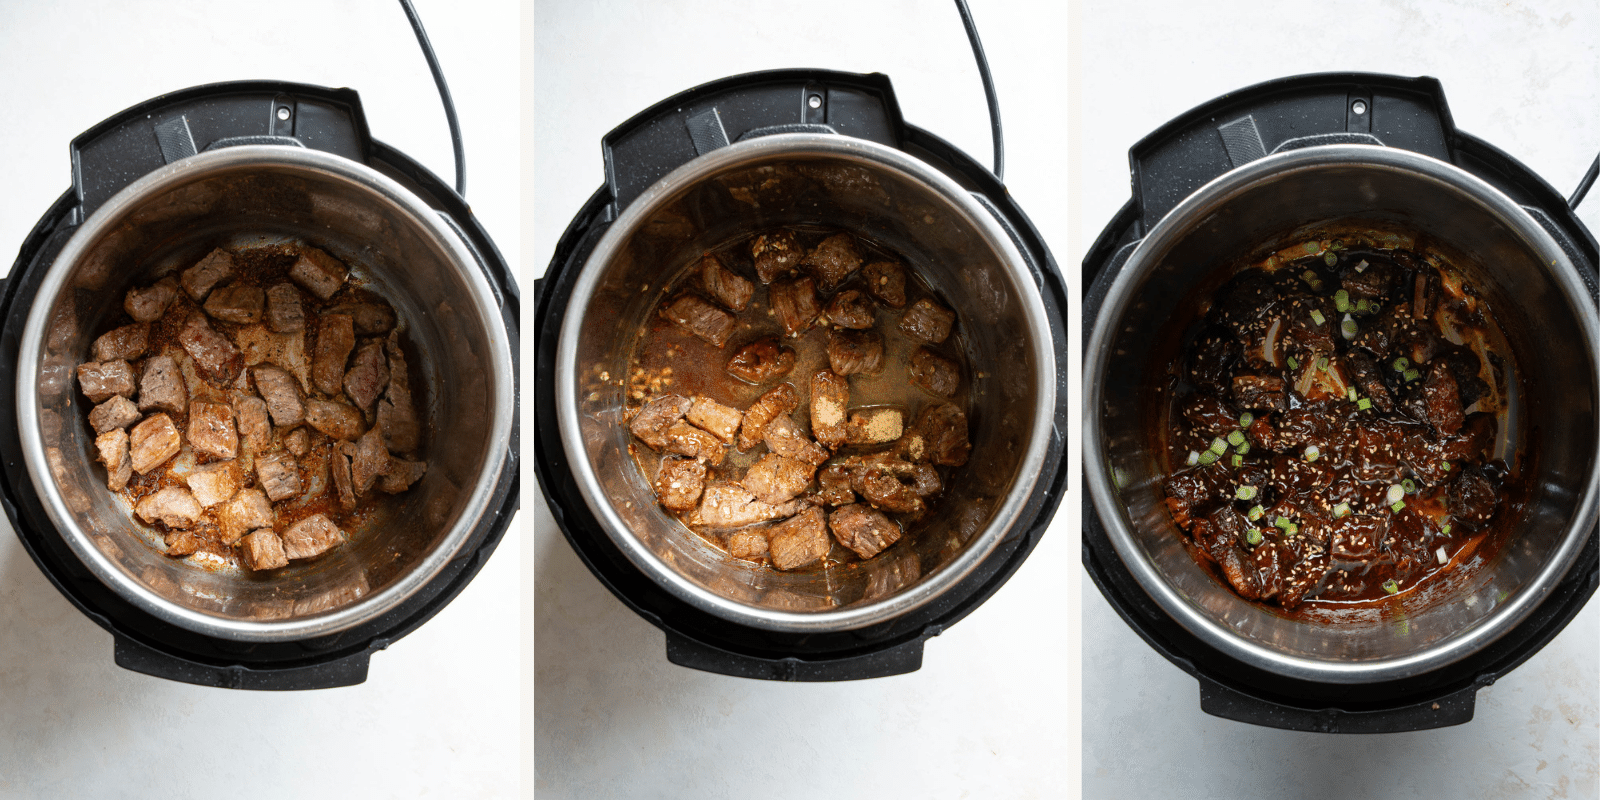
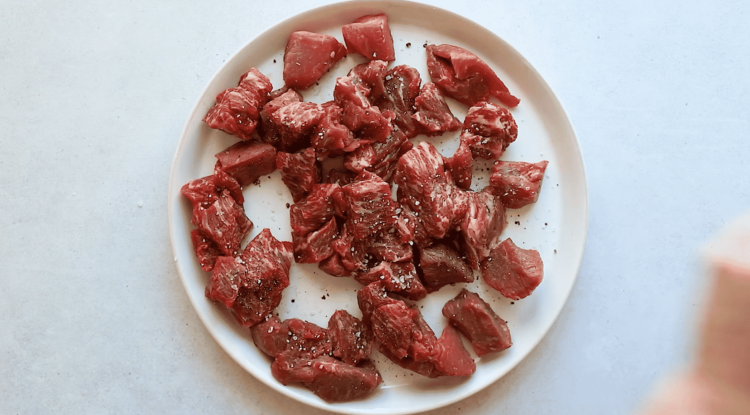
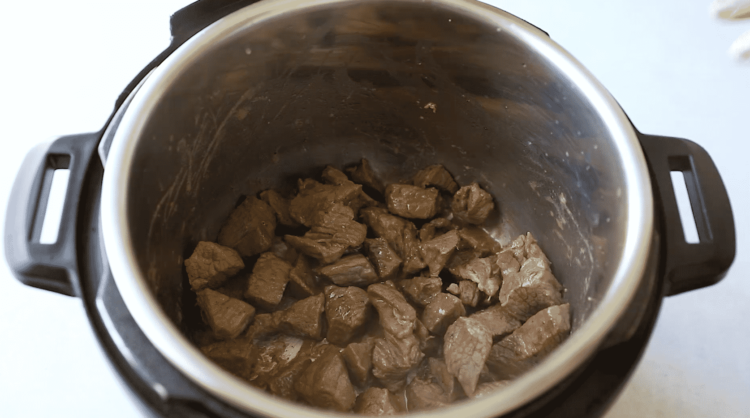
- First, season the beef stew meat with salt and pepper. Sauté in the Instant Pot with some sesame oil until browned on all sides.
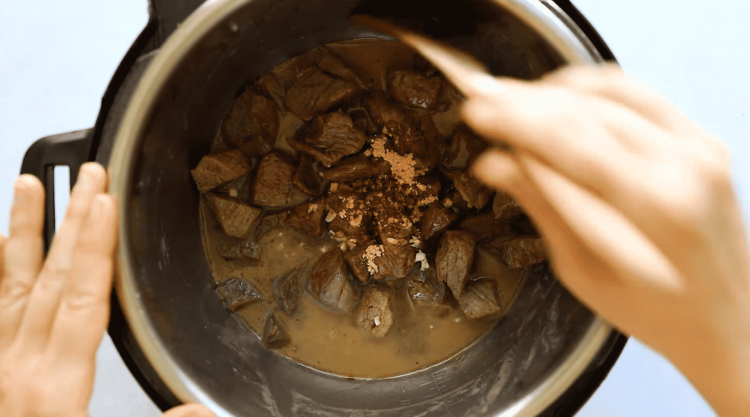
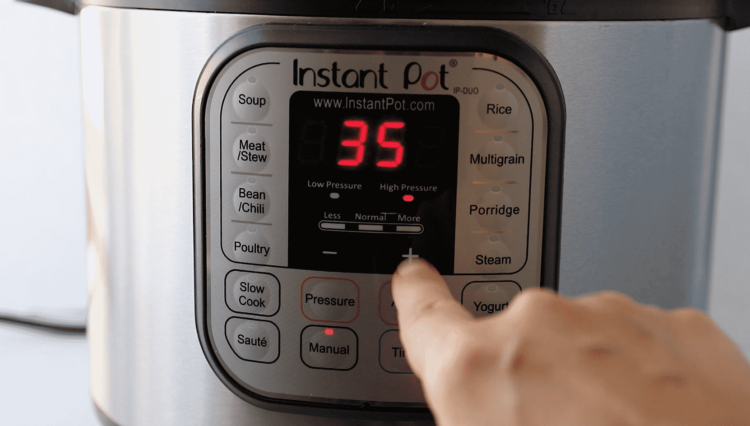
- Add all the ingredients, except for the garnishes, then lock the lid and set the pressure release valve to seal. Cook on high pressure for 35 minutes.
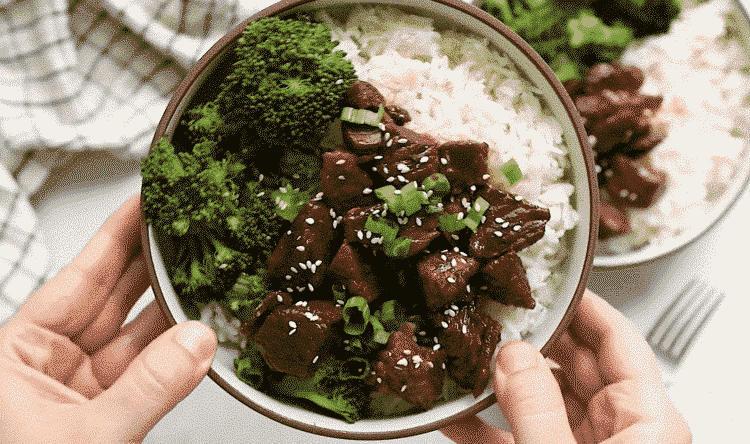
- Do a natural pressure release, then remove the lid and stir everything well. Serve with green onion and sesame seeds sprinkled on top.
What if I don’t have an Instant Pot?
You can easily make Instant Pot Korean beef on the stovetop. The recipe mainly includes meat and sauce ingredients.
In this instance, you’ll want to replace the stew meat cubes with thinner slices of beef. Cut these yourself from a rib-eye, sirloin, or flank steak. You can also purchase pre-sliced beef for stir fry.
To make this Korean beef on a stovetop:
- Heat a neutral cooking oil in a large pan over medium-high heat.
- Mix the sauce ingredients, with a few adjustments. Replace the broth with 2 tablespoons of rice vinegar. Also, add 2 tablespoons each of water and cornstarch to thicken the sauce.
- Season the beef strips with salt and pepper, then brown in the pan on both sides.
- Pour the sauce over the beef and let simmer for an additional minute, stirring to coat the meat.
- Serve with your side of choice. Make sure to spoon extra sauce over the meat!
Tip: How to cut your own beef stew meat
- Choose a beef chuck roast and use a long, sharp knife to trim off any hard fat.
- Cut the roast into 1-inch slices, like you would a loaf of bread.
- Next, cut each slice into 1-inch strips.
- Then cut each strip into 1-inch cubes.
What to serve with Korean beef
Keep your sides simple to compliment the flavors in the sauce.
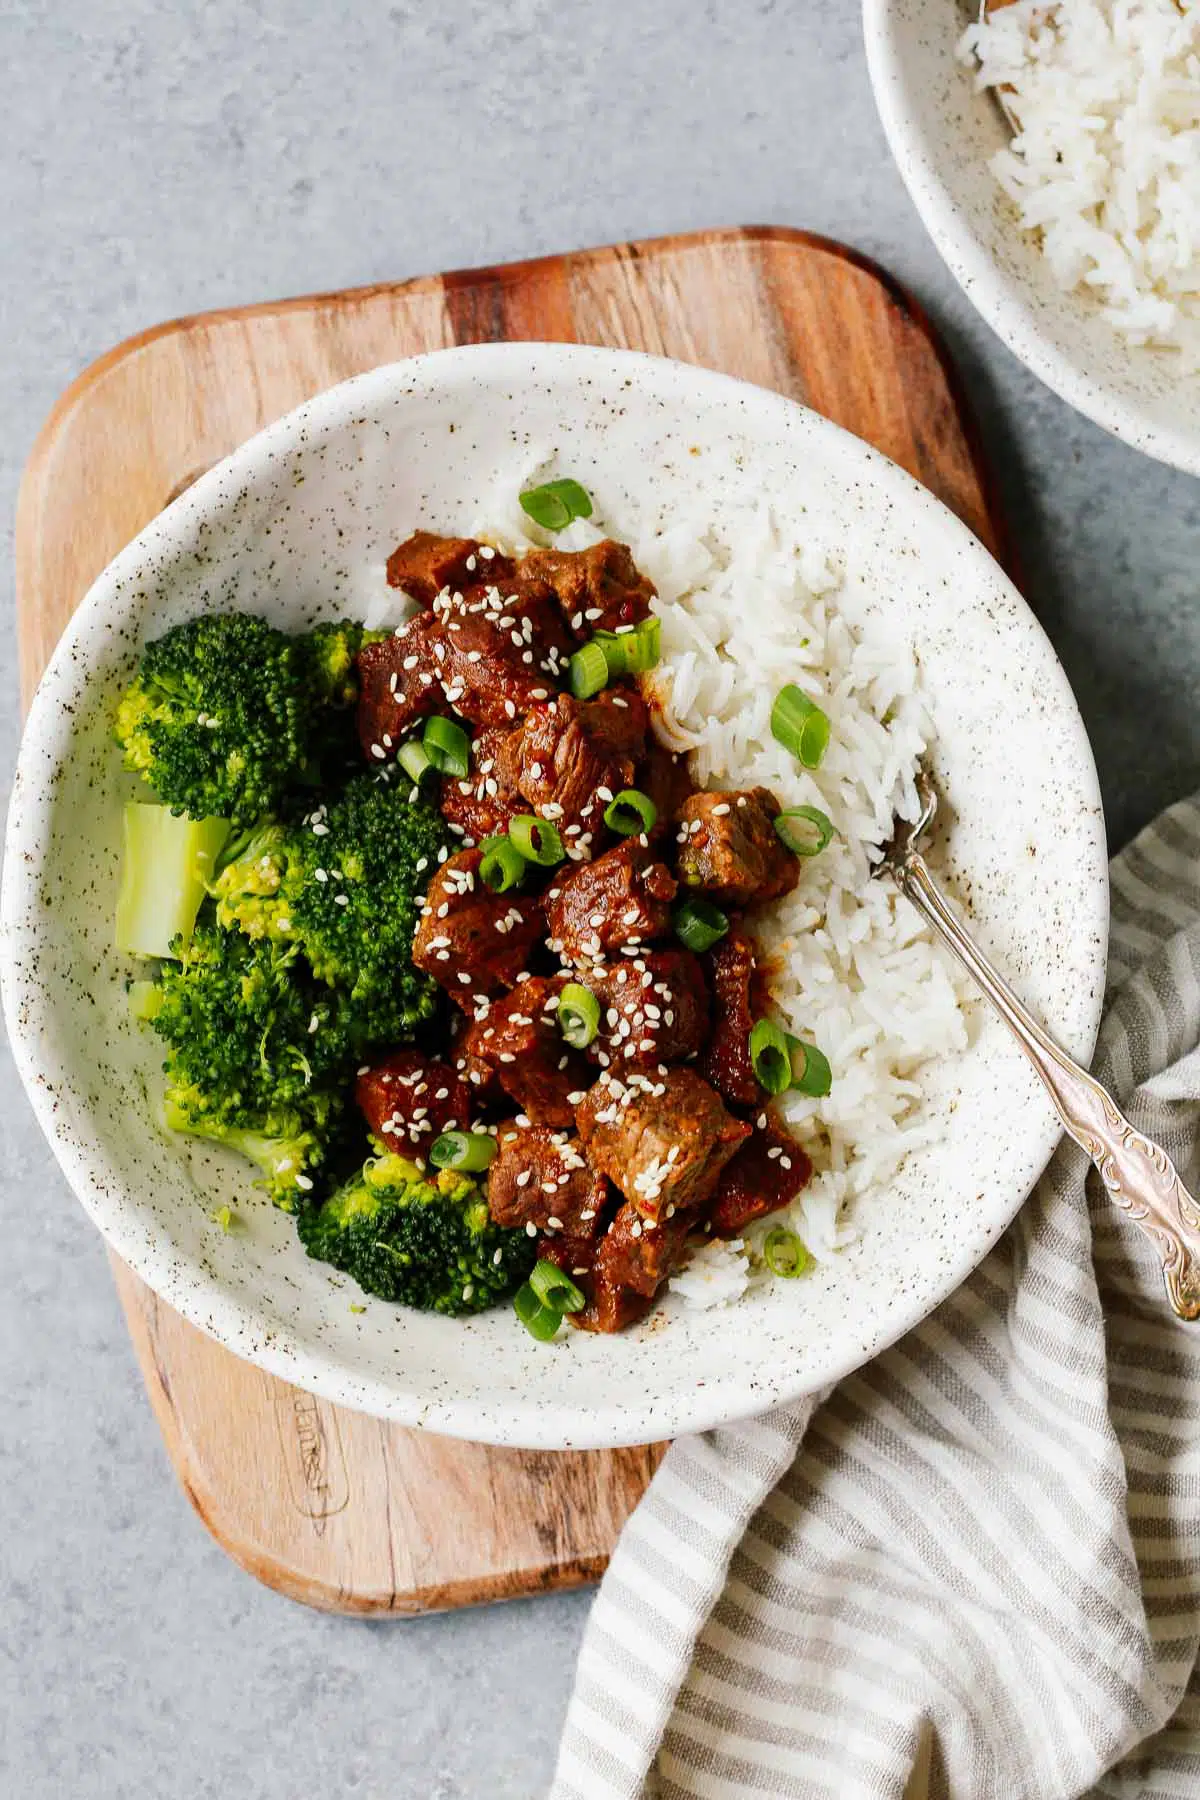
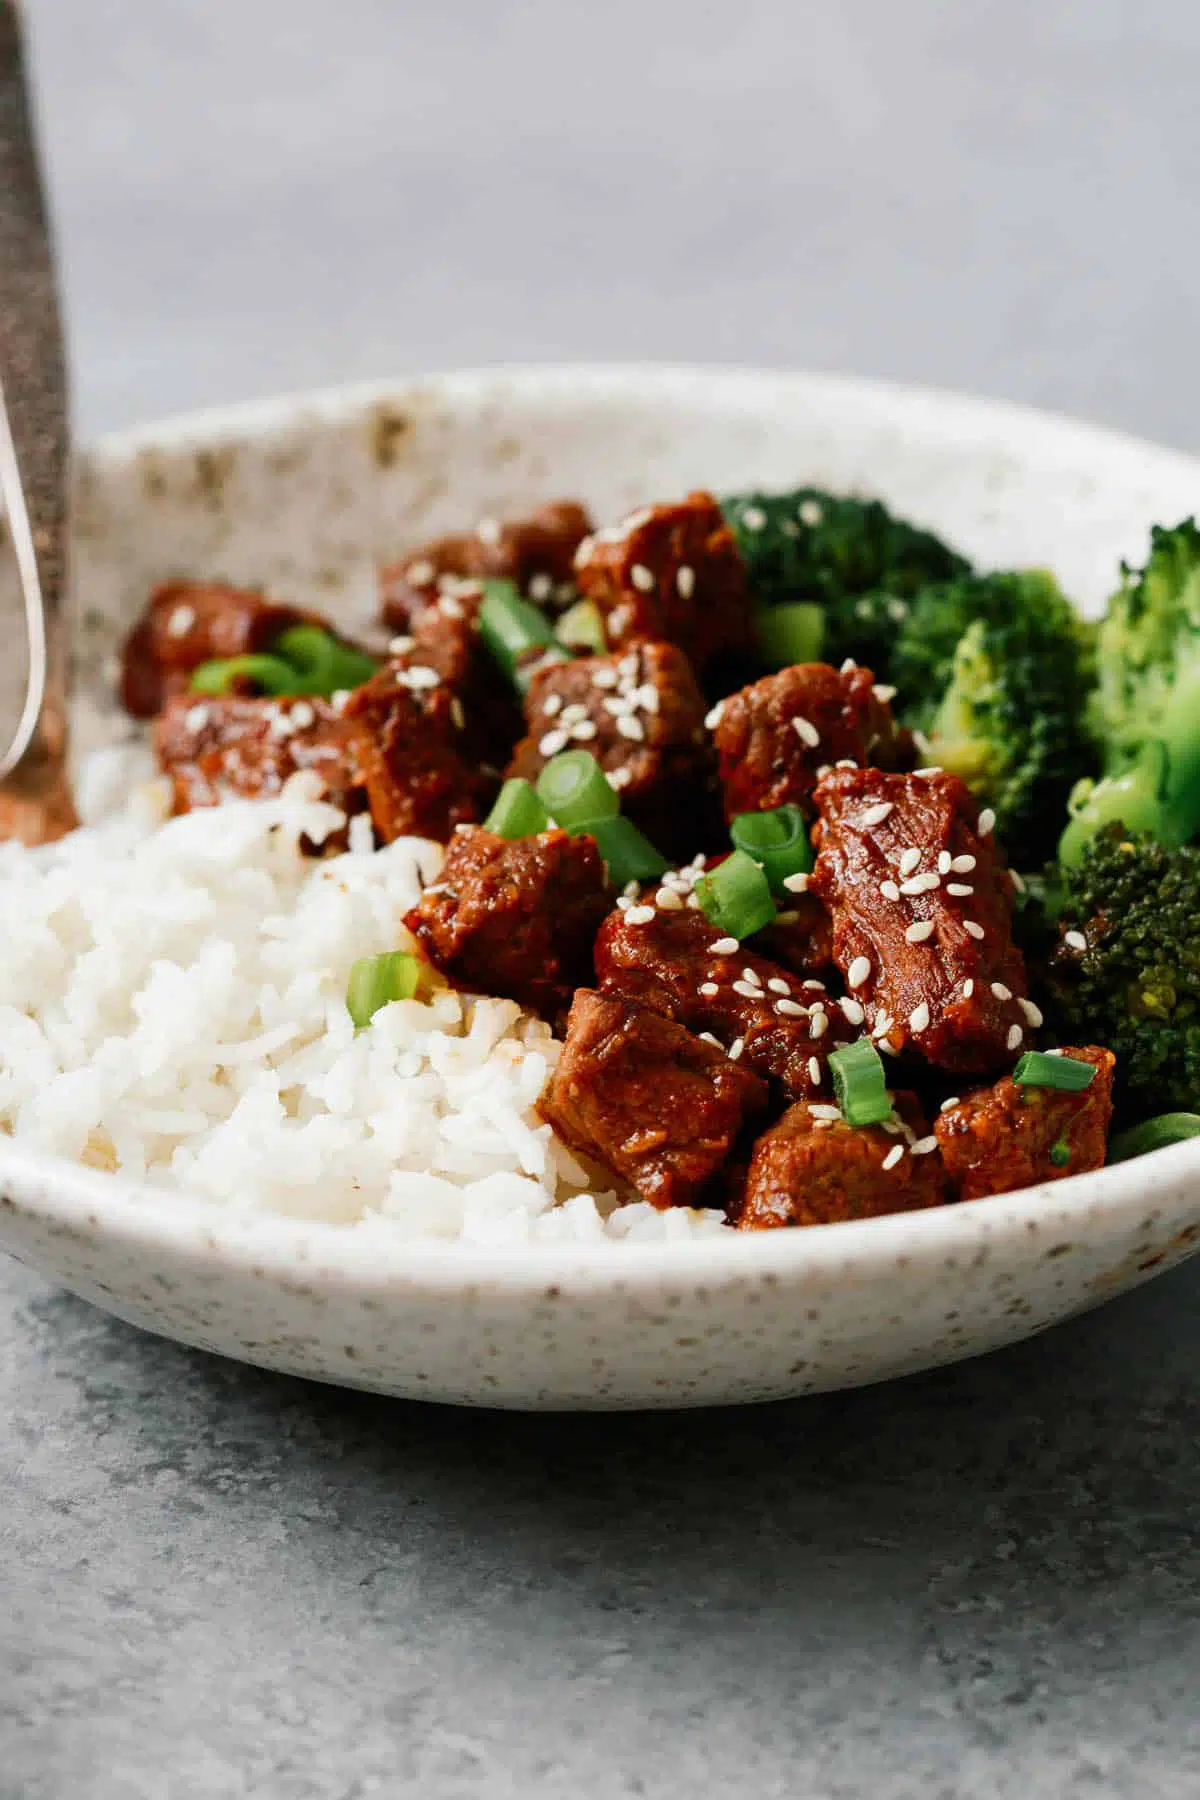
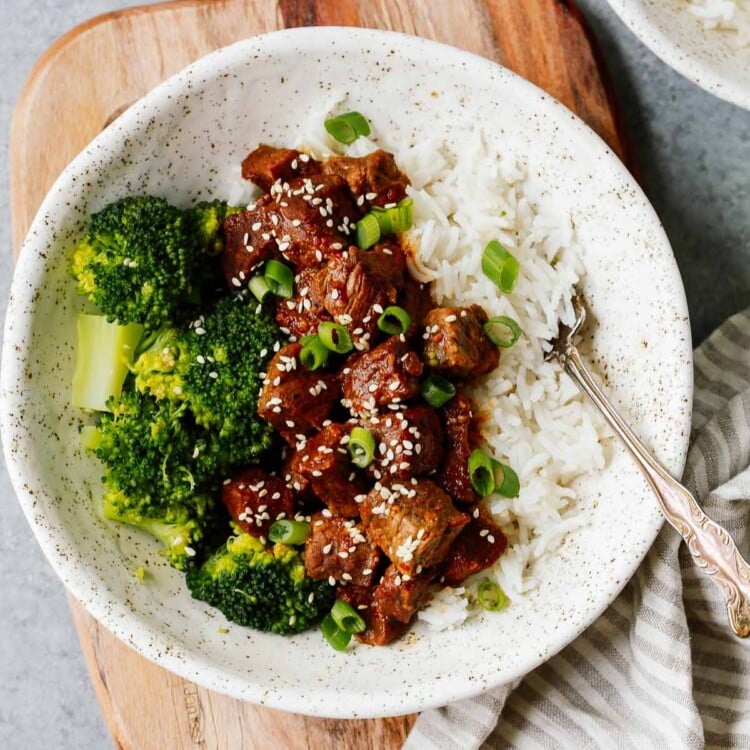
Serve over rice: use your favorite long grain rice, brown rice, or cauliflower rice. I like how flavorful this recipe is. When I put it over rice, I spoon the sauce onto the rice so it can soak up all the flavor!
Serve it with tacos: You can serve it with tacos and transform this dish into Korean beef tacos.
Add a vegetable: try steamed or sautéed broccoli, carrots, or bell peppers, or even roasted veggies.
Extra heat: mix in some kimchi, a traditional Korean spicy side dish of fermented cabbage and radish.
Olivia’s Recipe tips
If your beef was frozen beforehand, make sure it is fully thawed before using so it doesn’t cook unevenly.
Make sure the beef pieces are even so they cook evenly. If you see a chunk that’s excessively large, simply cut it down.
If you don’t have ground ginger, you can swap for fresh ginger instead.
How To Store Leftovers
To Store: Keep the leftovers in an airtight container in the fridge for up to 4 days. I also love using the leftovers for meal prep with rice and broccoli!
To Freeze: Korean beef is freezer friendly! Once cooled, you can store it in a freezer-safe bag or container for up to 3 months.
To Reheat: When ready to eat, simply thaw overnight in the fridge and reheat on the stovetop or microwave.
Frequently Asked Questions
Yes, it’s better to brown the meat first. You just need to season the meat with kosher salt and black pepper right before browning.
I would say for large chunks, you should cook for about 20 minutes (per pound of meat) at high pressure. For small chunks, it should be around 15 minutes in high pressure. For both, please use a quick pressure release method.
No, the Instant Pot typically doesn’t make meat tough. It’s designed to cook meat quickly and efficiently, often resulting in tender results. However, proper cooking times and techniques are essential for optimal tenderness.
If you can’t find it pre-packaged at the store, you can ask the butcher to prepare some for you or you can make your own at home. Or, if you don’t have any beef stew meat, you can use trimmed chuck roast or top sirloin cut instead.

Instant Pot Korean Beef
Video
Ingredients
- 1 lb beef stew meat
- Salt and black pepper to taste
- 1 tbsp sesame oil
- ½ cup beef broth
- 3 cloves garlic minced
- 3 tbsp honey
- 2 tbsp coconut aminos for gluten-free or soy sauce.
- 1 tsp ground ginger
- ¼ tsp crushed red pepper flakes
- green onions sliced
- sesame seeds for garnish
Instructions
- Set a 6-qt Instant Pot® to the sauté setting. Season the meat with salt and black pepper.

- When the pot is hot, add sesame oil and beef. Cook for about 5-7 minutes or until the meat is browned on all sides. Remember to stir occasionally.

- Then, add the beef broth, garlic, honey, coconut aminos, ginger and red pepper flakes to the pot.

- Put on the lid, lock it and check to see if the vent is at sealing.
- Then, select manual setting; adjust pressure to high, and set time for 35 minutes. Mine took about 15 minutes to reach pressure.
- After the 35 minutes is up, let it naturally release pressure. Open the pot and give a good stir.

- Top with green onions and sesame seed before serving with steamed broccoli or brown rice. Enjoy!

Tips
- To prevent a bitter flavor, wait until the pot is hot before adding the sesame oil.
- Do not skip browning the beef as it locks in flavour.
- Always cut the beef as uniformly as possible so they cook evenly.
Nutrition Information
Nutrition information is calculated using an ingredient database and should be considered an estimate.
Wendy Stark says
Can I double this recipe in my 6 quart instant pot, browning the meat in two batches? Does the pressure cooking time stay the same?
Olivia says
Yes you can. Just increase the cooking time to 2 minutes more.
Aileen Francis Mcgee says
Of you double recipe how long will it cook
Aeji Byun says
I’m Korean and we don’t use honey on entree so I replaced it with sugar (1-2tbp) with Korean red peoper powder (gochugaru). Chefs kiss yum!!
Olivia says
Yes it works with sugar too 😉
NatalieY says
Brown sugar or regular sugar?
Karen says
No Instapot. Can you cook on stove or slow cooker. If so how long?
Olivia says
I’m sorry I can’t tell you how long because I’ve never made this recipe on the stove or slow cooker, but I believe it probably will take about 35-40mins.
Sasha says
I’m giving this dish 5 stars though I think the flavor profile could be modified a bit.
I am actually amazed at how the sauce came out thick and looked like the photo!
I did do a few things different and is as follows: I did coat the meat with cornstarch prior to sautéing as I was concerned it would be too liquidy at the end which seems to be pretty common when I use the instant pot.
It seemed like it wouldn’t be enough liquid- but it was enough, it was perfect!
I used 2.3 lbs of chuck roast cut into chunks (did not use frozen meat). I added the sesame oil with the liquid before putting the lid on.
I used Kilimanjaro soy sauce instead of aminos did end up adding some dark brown brown sugar once it was done. I’m wondering if adding a little fish sauce might help it taste more like a stir fry. Regardless, this is a good recipe and is likely healthy for you if made as instructed. I will definitely be making it again.
Thank you for sharing your recipe!
Olivia says
happy you liked it and thanks for these suggestions 😉
Betty says
Meat is very chewy and dry. I won’t make
this again.
Olivia says
I’m sorry to hear that the meat turned out dry. To better understand, did you follow the recipe exactly or make any adjustments to the ingredients or cooking time? Sometimes the meat can turn dry if it’s overcooked or if there’s less moisture in the cooking process. Adjusting the cooking time or ensuring enough liquid is in the pot might help improve the tenderness and juiciness of the meat. If you need any assistance or tips for next time, I’m here to help!
Tan says
I made this as is but halved for my 3qt pot. My husband and I really enjoyed it as is served over rice. A great weekday meal with a lot of taste and not a lot of effort to make. Awesome!!
Olivia says
Absolutely, I also think this is a great recipe for a weekday meal!
Randi says
Do I need to use more liquid if I have an 8 quart Instant Pot?
Olivia says
Yes you have to, but unfortunately since I don’t have an 8 quart Instant Pot, I am not sure how much liquid you need for it.
JO says
I love this recipe, though I do modify it. The main modifications are 1.5 tbsp gochugaru for 2-2.5 lbs meat, quite a bit more garlic (3 small serving spoons of minced garlic-I love garlic and spice) and adding daikon and potatoes plus a handful of frozen veggies to the instapot. I also do drain some meat juices after the saute step.
Olivia says
Thanks for sharing your tweaks! Sounds tasty!
Marisa says
How long is the natural release?
Olivia says
Hey! The natural release time can vary depending on the recipe and the amount of pressure built up in the Instant Pot. Typically, it can take anywhere from 10 to 20 minutes for a natural release. I hope this helps!