
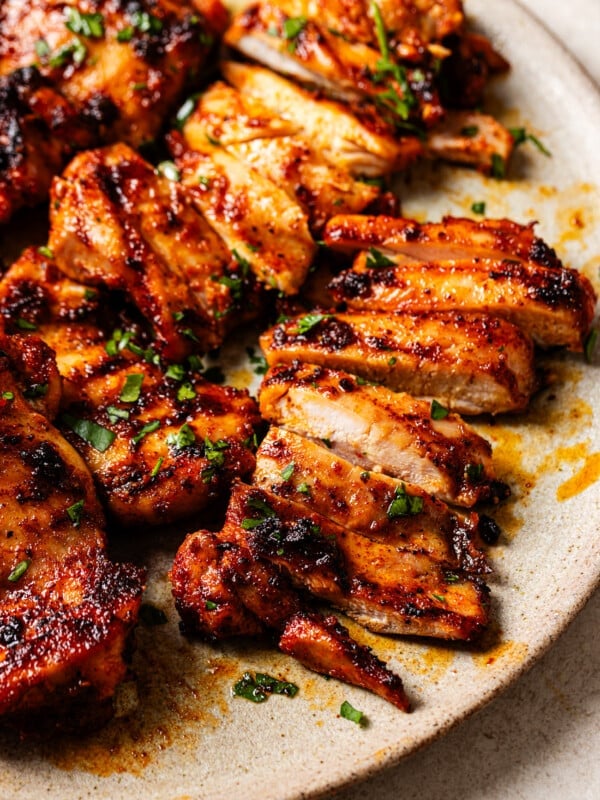
Pan seared chicken thighs come out of this recipe with golden, crispy skin and a simple garlic pan sauce made from the drippings in just 25 minutes on the stovetop. This is a bone-in, skin-on recipe with no oven time and no complicated steps. It is gluten-free, low-carb, and the kind of dinner I make on repeat when I need something fast that actually tastes like I put in real effort.

My Pan Seared Chicken Thighs
I have been making pan seared chicken thighs since Thomas was small, back when I was figuring out which weeknight dinners could survive a busy schedule without losing any flavor. This recipe won. I have made it in every pan I have ever owned — a stainless steel skillet, a nonstick, and my cast iron — and the cast iron always gives the best result. The heat retention is even, the skin gets genuinely crispy, and the fond that builds up at the bottom becomes the base of the garlic pan sauce. Nothing goes to waste.
What I love about this version compared to most pan seared chicken thigh recipes is that it does not stop at the sear. Once the chicken is cooked, you build a quick sauce right in the same pan using garlic and chicken broth, scraping up all those caramelized bits from the bottom.
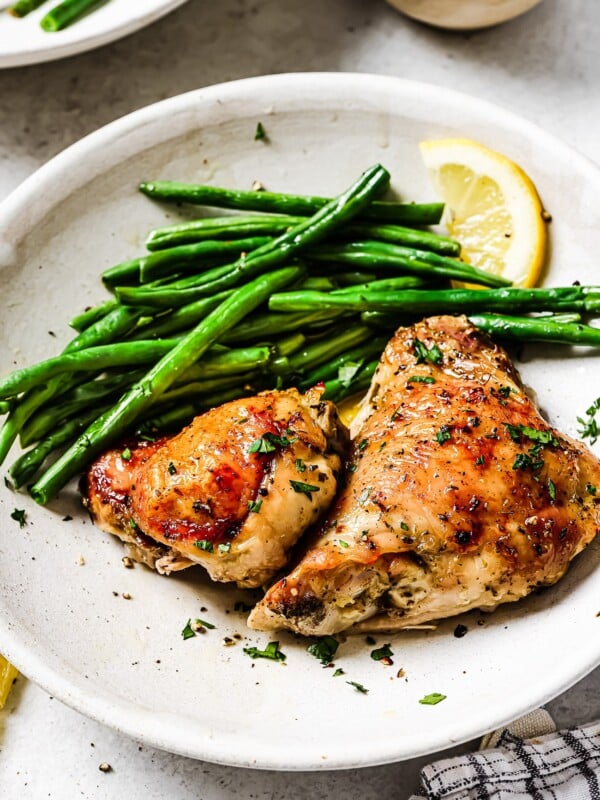
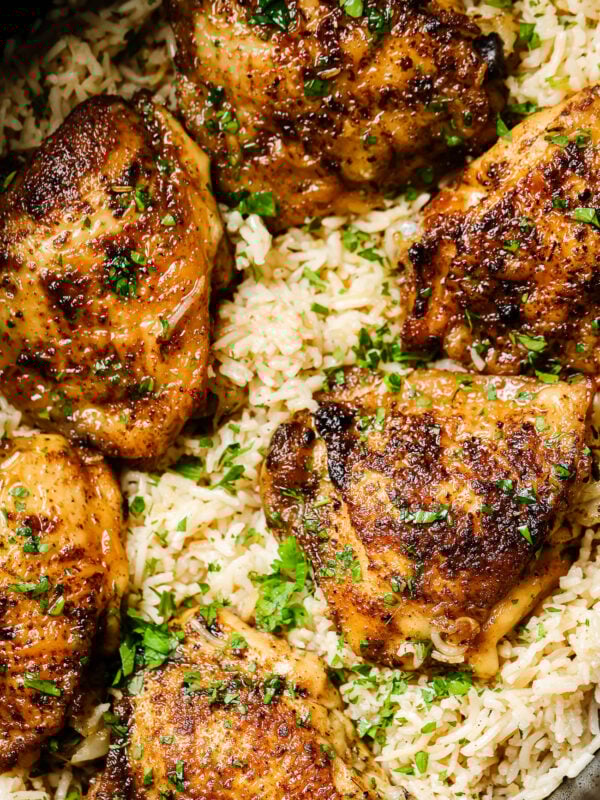
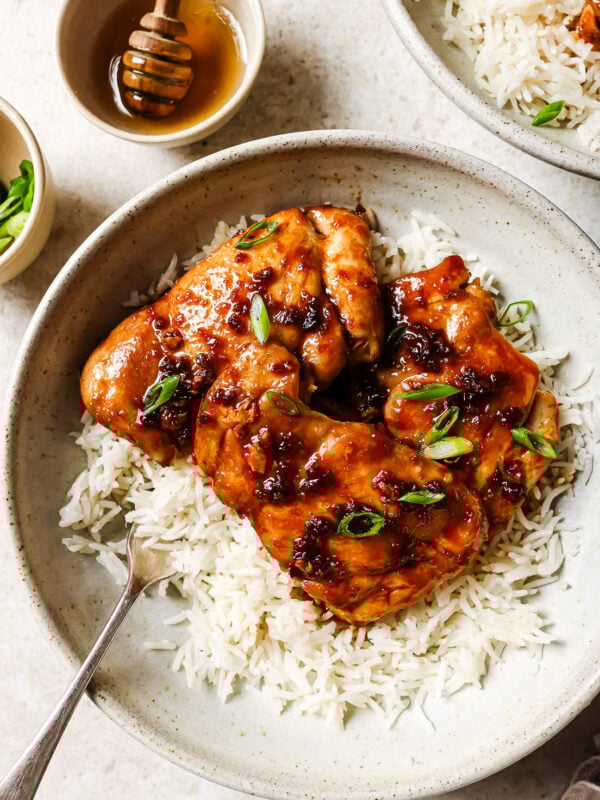
Pierre calls it “the good stuff.” Thomas just asks for more of whatever is pooled under the chicken. I usually serve these over my fluffy stovetop rice or potatoes au gratin or mashed potatoes so every drop of that sauce gets absorbed. On nights when I want something lighter, my easy roasted vegetablescome together in the same amount of time as the chicken.
This recipe works on a regular weeknight, a Sunday when you want something that feels like effort without being effort, and as a meal prep base. The leftovers reheat beautifully in a skillet with a splash of broth to bring the sauce back.
All ingredients and their amounts are listed in the recipe card at the bottom of this post.
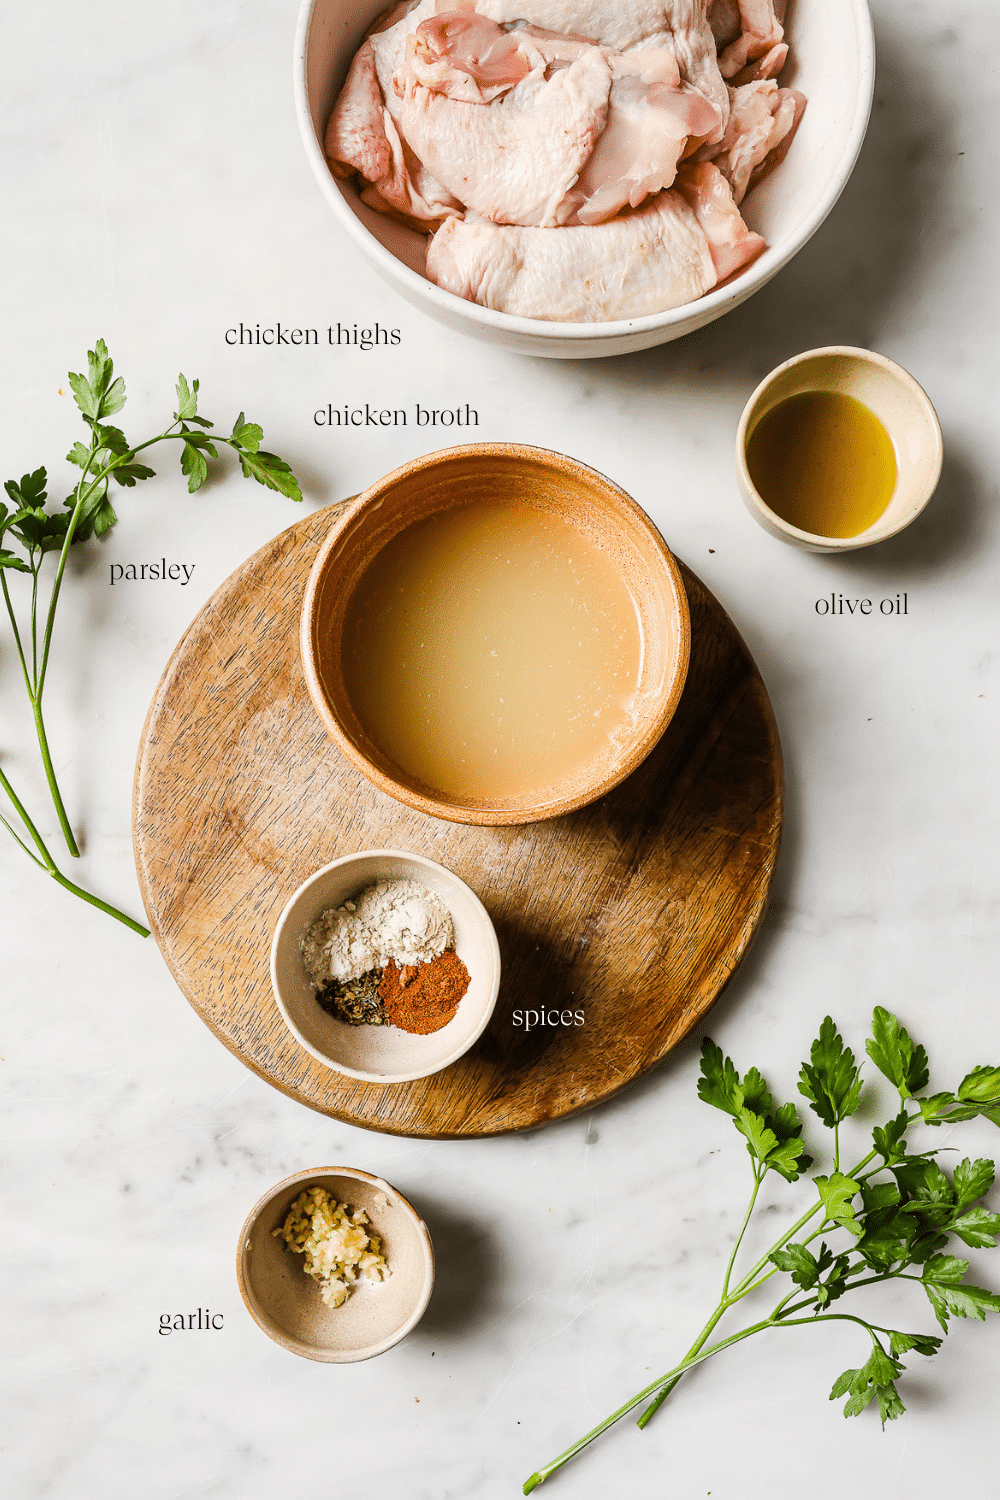
Bone-in, skin-on chicken thighs: This is the cut I always recommend for pan searing. The bone keeps the meat from drying out during the longer cook time, and the skin is what creates that crispy golden layer that makes this recipe worth making. I have tested this with boneless, skinless thighs too. They work and they cook faster, but the skin is where all the real texture comes from. If you only have boneless thighs, reduce the searing time by about 2 minutes per side and check your internal temperature earlier. The recipe notes below cover the timing adjustments.
Olive oil: I use extra virgin olive oil for this recipe. You want enough to coat the bottom of the pan so the skin makes even contact with the heat. Avocado oil is a fine substitute if that is what you have.
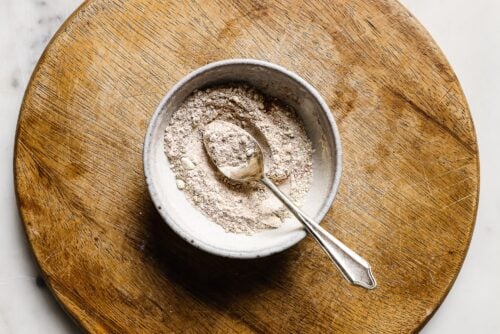
The seasoning blend: I have tested this recipe with a lot of different spice combinations and I keep coming back to this one because it is savory without being sharp and it forms a crust on the skin during the sear. The paprika helps with color as much as flavor. If you want more heat, a pinch of cayenne works well here. My homemade Cajun seasoning is another option if you want something with more complexity.
Pro Tip: Season both sides of the chicken and let it sit at room temperature for 10 to 15 minutes before it goes into the pan. Cold chicken straight from the fridge lowers the pan temperature the moment it hits the oil, which slows the sear and makes it harder to get that crispy skin.
Fresh garlic cloves: I use 2 cloves, minced, added after the sear when the pan is slightly cooler. This is important. Garlic burns fast in a hot pan. If you add it too early or the heat is still too high, it will turn bitter before it has a chance to become aromatic. I recommend adding it right after you flip the chicken for its second sear, while the heat is still medium-high, and moving it around the pan so it doesn’t sit in one spot.
Chicken broth: This is what creates the pan sauce. I pour it in after the garlic, reduce the heat to medium-low, and use a wooden spoon to scrape up every bit of fond from the bottom of the pan. Those browned bits are where all the flavor is. If you don’t have chicken broth, white wine works beautifully here and adds a slightly different character to the sauce. I have also used my homemade vegetable broth in a pinch and it works fine, though the flavor is lighter.
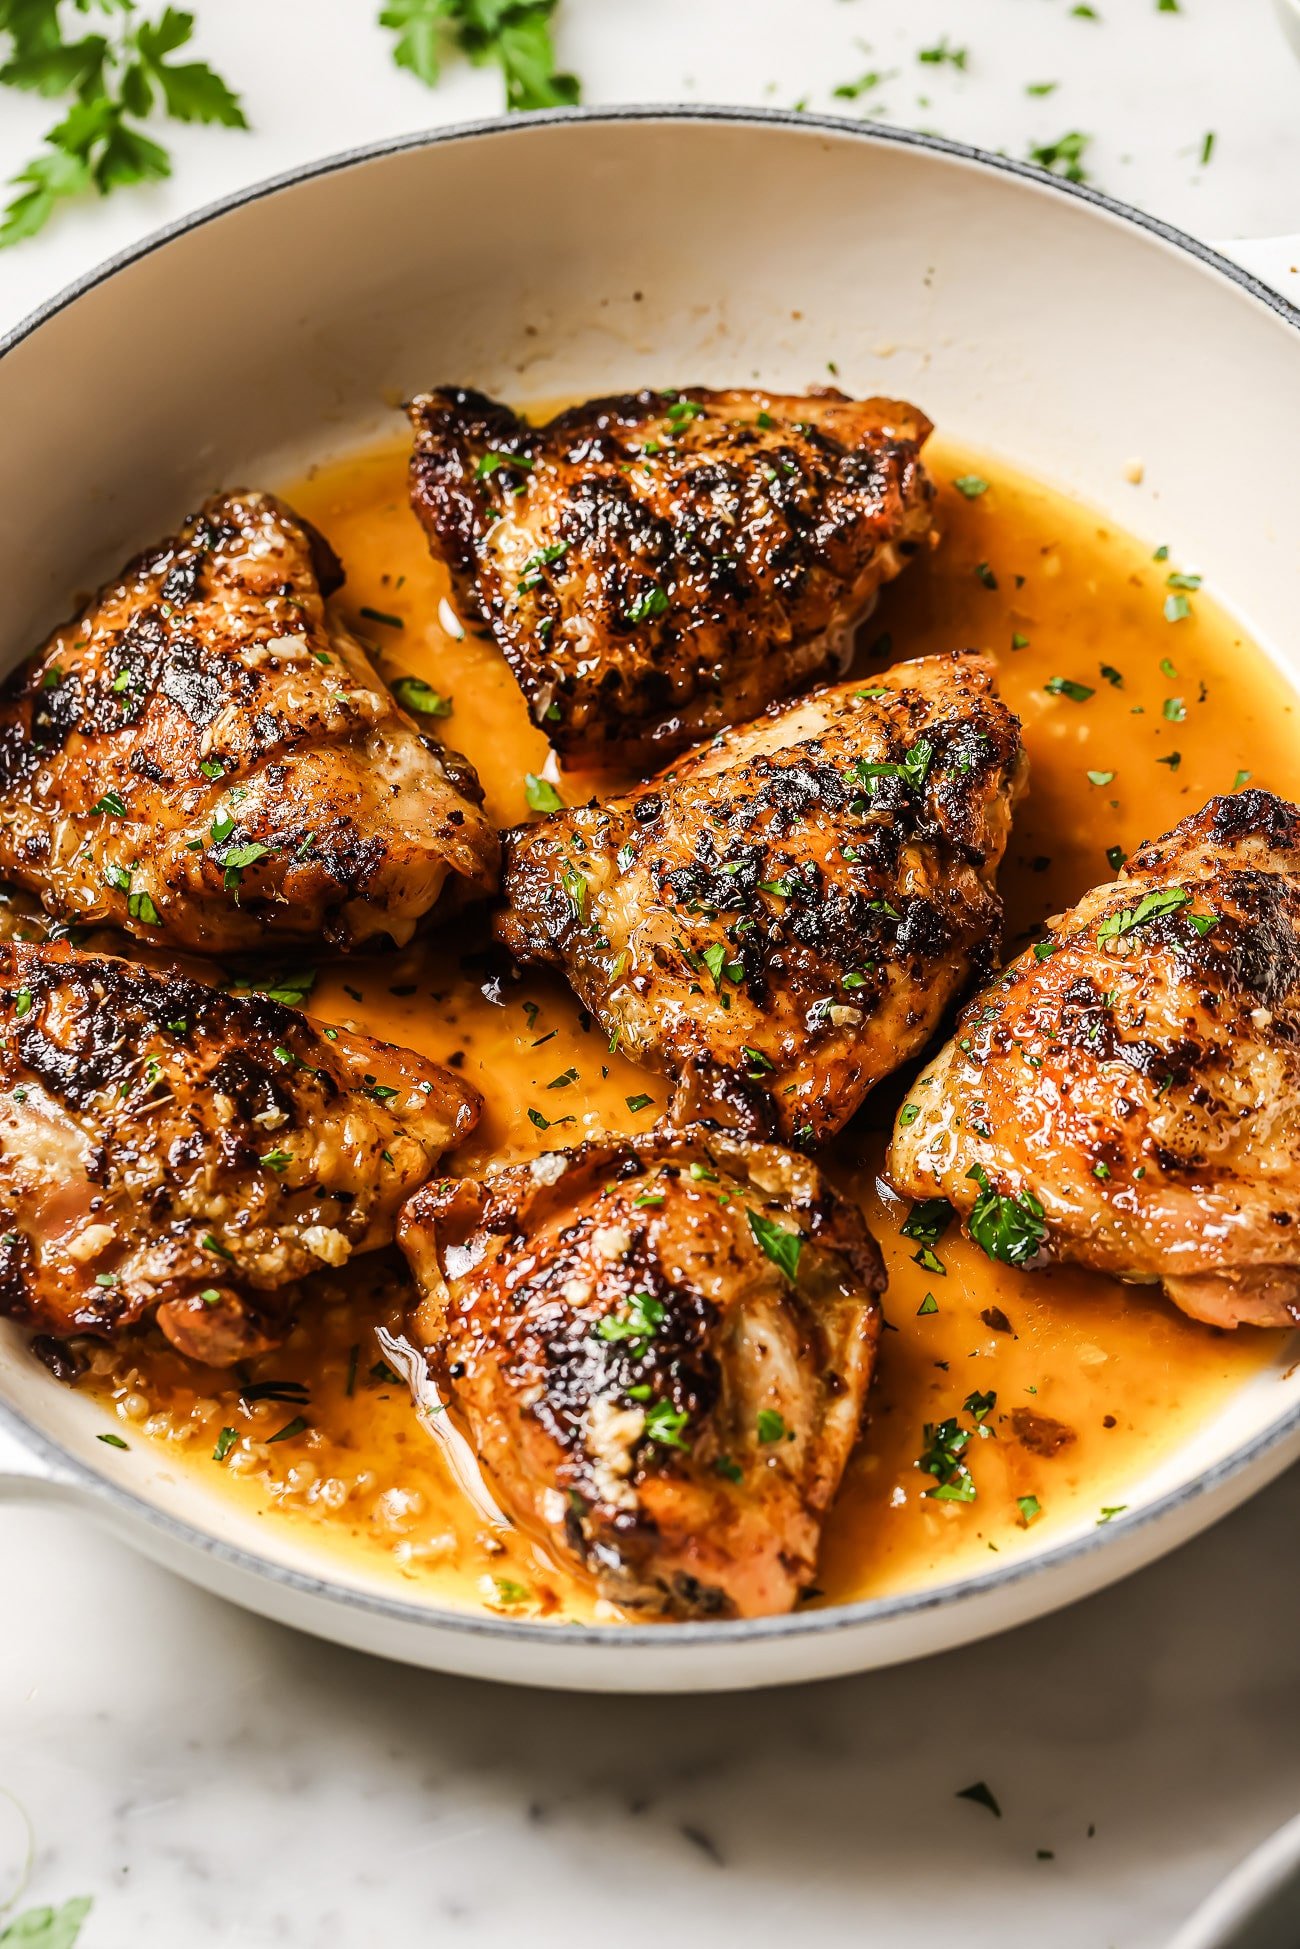
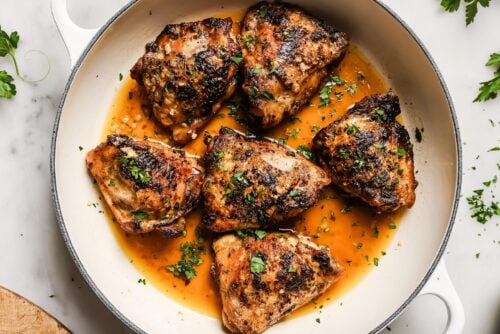
Fresh parsley: I use this as a garnish, but it is not just decoration. A handful of chopped fresh parsley cut through right at the end brightens the whole dish and balances the richness of the pan sauce. Fresh thyme or rosemary work well too, depending on what you have and what you are serving alongside.
How to make Pan Seared Chicken Thighs
Preheat your cast iron skillet or heavy-bottomed skillet over medium-high heat before you do anything else. The pan needs to be fully hot before the chicken goes in. A cold pan is the most common reason the skin does not get crispy.
Step 1. Pat the chicken completely dry.
Take the chicken thighs out of the fridge and pat every surface dry with paper towels, including the underside. Any moisture left on the skin will turn to steam the moment it hits the oil, and steam is the enemy of crispy skin. This step takes 30 seconds and it matters more than any seasoning.
Step 2. Season generously on both sides.
Mix the garlic powder, paprika, onion powder, dried oregano, salt, and black pepper in a small bowl. Coat both sides of each chicken thigh evenly, pressing the seasoning in gently so it sticks. Do not rush through this step. Even coverage means even flavor across every bite.

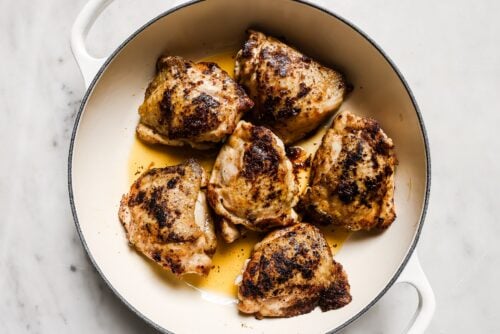
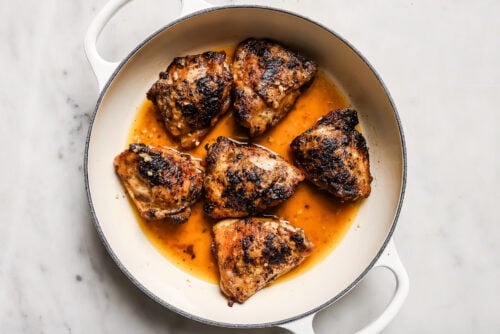
Step 3. Sear skin-side down and do not touch it.
Add the olive oil to your hot pan. Once the oil shimmers, place the chicken thighs skin-side down. Now the most important part: leave them alone. Do not press them, do not move them, do not check on them every 30 seconds. Let them sear undisturbed for 5 to 7 minutes. You will know the skin is ready to flip when it releases from the pan on its own. If you try to lift the chicken and it resists, give it another minute. The skin is telling you it is not done yet. Forcing it off the pan tears the skin and ruins the crust.
Step 4. Flip and sear the second side.
Once the skin is deep golden brown and releases cleanly, flip the chicken and sear the second side for 3 minutes. The skin side is the star, so the second sear is shorter. At this point, I like to add minced garlic directly to the pan and move it around with a wooden spoon. You want it to become fragrant and golden without burning, which takes about 30 seconds at medium-high. Watch it closely.
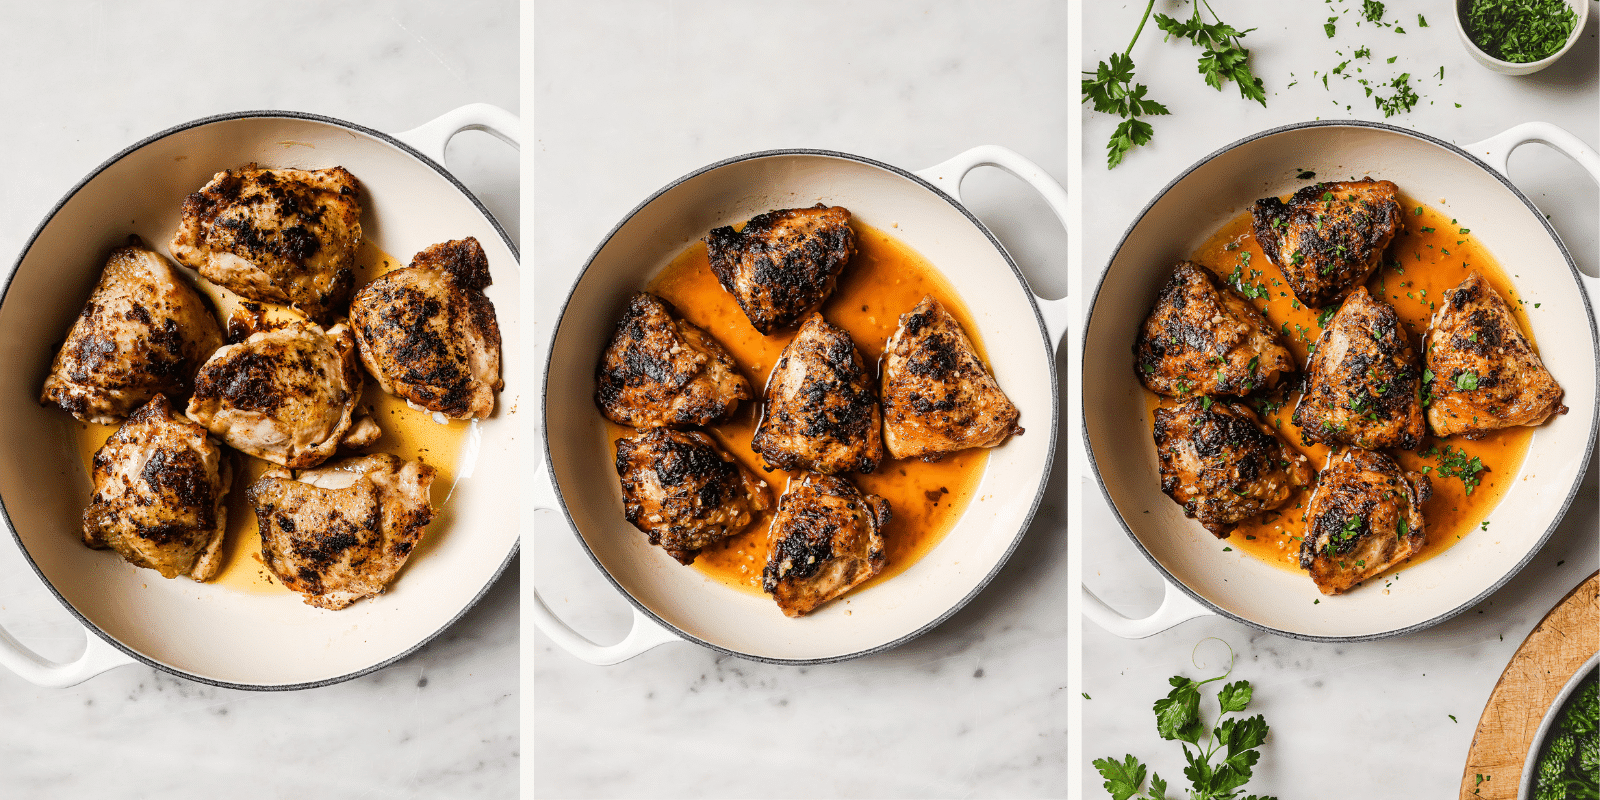
Step 5. Build the pan sauce and finish cooking.
Reduce the heat to medium-low. Pour in the chicken broth and use your wooden spoon to scrape up every browned bit from the bottom of the pan. Those caramelized drippings dissolve into the broth and become the sauce. Let the chicken simmer in the broth for 7 to 10 minutes until the internal temperature reaches 165°F when you insert a meat thermometer into the thickest part of the thigh, avoiding the bone.
One thing worth knowing about chicken thighs specifically: the meat can look pinkish-brown even when it is fully cooked. This is different from chicken breasts. Do not judge doneness by color alone. Use a thermometer. 165°F means it is safe and juicy. Going beyond 175°F is fine for thighs too, they have enough fat to stay tender, but 165°F is the minimum.
Step 6. Rest, garnish, and serve.
Remove the chicken from the heat and let it rest for 5 minutes before serving. This gives the juices time to settle back into the meat instead of running out when you cut it. Garnish with chopped fresh parsley and a squeeze of lemon if you like. Spoon the pan sauce over the top of each thigh and serve immediately.

Olivia’s Best Recipe Tips
The pan matters more than you think. A cast iron skillet (or the Le Creuset Enameled Cast Iron) gives the most even sear because it holds heat consistently even when the cold chicken hits the surface. A thin stainless steel pan works too, but avoid nonstick for this recipe. Nonstick pans cannot handle the sustained high heat you need for a proper sear without the coating degrading over time.
If your thighs are very large, finish them in the oven. Some bone-in chicken thighs are unusually thick, and 7 to 10 minutes in broth on the stovetop may not be enough time to bring them to 165°F without the skin softening. In that case, after building the pan sauce, transfer the whole skillet to a 400°F oven for 10 to 15 minutes. The skin stays crisp and the chicken cooks through evenly.
Do not skip resting the chicken. Five minutes of resting before serving is not optional. Cutting into chicken right off the heat sends all the juices straight onto your cutting board. Resting lets them redistribute into the meat, which is the difference between a juicy thigh and a dry one.
Deglaze the pan even if you plan to serve without a sauce. Even if you decide to skip the broth and pan sauce, still add a small splash of something (water, wine, or broth) to the pan after cooking and scrape up the fond. Those drippings can be spooned over the chicken as a simple finishing glaze and they add a layer of flavor you cannot get any other way.
Adjust the cook time if you use boneless thighs. Boneless, skinless thighs sear much faster. Use 4 to 5 minutes on the first side and 4 to 5 minutes on the second, then check the temperature. Skip the extended braise step and just spoon the sauce over at the end.

More Chicken Thigh Recipes

Crockpot Chicken and Sweet Potatoes
1 hr 10 mins
Lemon Chicken Thighs
24 mins
Grilled Chicken Thighs
35 mins

Pan Seared Chicken Thighs – Crispy Skin and Tender Inside!
Equipment
Ingredients
- 6 chicken thighs bone-in with skin
- 1 tablespoon olive oil
- 1 teaspoon garlic powder
- ½ teaspoon paprika
- ½ teaspoon onion powder
- ¼ teaspoon dried oregano
- salt and black pepper to taste
- 2 garlic cloves minced
- 1/2 cup chicken broth
- fresh parsley for garnish chopped
Instructions
- Pat the chicken thighs dry with paper towels to remove excess moisture.

- In a small bowl, mix garlic powder, paprika, onion powder, dried oregano, salt and pepper. Sprinkle this seasoning mixture over both sides of each chicken thigh, ensuring even coverage.
- In a skillet, heat olive oil over medium heat. Make sure the pan is hot before adding the chicken to achieve a crispy skin.
- Place the seasoned chicken thighs in the hot skillet, skin side down. Allow them to sear undisturbed for 3-5 minutes or until the skin is golden brown and crispy. Flip the thighs and sear the other side for an additional 2-3 minutes.
- Add minced garlic to the skillet. Sauté briefly until aromatic, being careful not to burn the garlic.
- Reduce the heat to medium-low. Pour chicken broth into the skillet, scraping the bottom to release any flavorful bits. Allow the broth to simmer, creating a delicious sauce.
- Continue cooking the chicken in the broth for about 7 to 10 minutes or until the internal temperature reaches 165°F (74°C). Remove the chicken from heat, garnish it with fresh parsley, and enjoy!

Notes
Nutrition
Nutrition information is automatically calculated, so should only be used as an approximation.
Did You Make This?
Follow @primaverakitchen on Instagram, snap a photo, and tag it #primaverakitchen. We’d love to see your recreation.


These are the best! My husband even said these thighs were the best he ever had and he’s not a big chicken fan. Thank you and keep the great recipes coming.
That’s amazing! So happy to hear that 😉
Amazing! I was skeptical when I saw how basic the recipe was but oh so pleasantly surprised when I took a bite!! Juicy, flavorful and easy!! What more could one ask for??
This makes me so happy to hear! 😊 I love that the simplicity surprised you — sometimes the basic recipes turn out the most flavorful. I’m thrilled you found it juicy, easy, and delicious. Thank you so much for trying it and sharing your feedback! 💛